HPT 101: Lesson 3: Overview and Rupture Phase
In this lesson, we define scientific terms, look at an overview chart, and then study the rupture phase.
****************************
VIDEOS:
Video 3A: Mechanical engineering terms you will need to know (26 min)
Here is the template page you will need to print out: HPT101 Video 3A template page
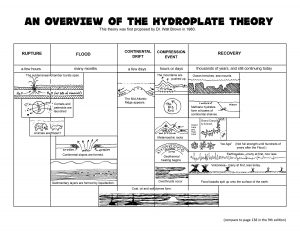
Video 3B: An Overview Chart (23 min)
Download and print a copy of this chart: HPT overview chart
Video 3C: Rupture Phase (36 min)
Here is the template page you will need to print out: HPT101 Video 3C template page
*******************************************************
Suggested activities for this lesson:
Activity 3.1: Try the flow simulator I demonstrated in video 3A.
https://phet.colorado.edu/en/simulation/legacy/fluid-pressure-and-flow
You can choose to download it to your computer. It is not a large program and takes no time at all to download. You can delete it when you are finished.
Activity 3.2: A VIDEO LAB (We saw this in video 3C)
Can a jet of water move a large volume of air?
Some critics of HPT say that the jetting fountains of water would have stripped away too much of Earth’s atmosphere. However, they fail to consider the physics of DIRECTED ENERGY. In this lab we use a hose to simulate the fountains of the deep, and we use a sm0ke bomb so that we can detect movement of air. (Notice how well the gentle breeze at the end of the video is able to move the air. A fan would have been more effective than our hose!)
If you want to try this yourself, you will need some tree stump remover that contains potassium nitrate. Use 3 parts potassium nitrate to 2 parts sugar, put the powdered mix in a saucepan and cook on very low heat. The sugar will gradually melt and turn tan. Be patient. Keep mixing the thick mixture until everything is completely dissolved. Remove from heat and put clumps of the mixture onto a piece of foil. Push the end of a short piece of string into each clump while still warm. Melt some candle wax on the string to make it into a fuse.
Activity 3.3: Paper ripping lab (Simulation of “T” in Indian Ocean)
It will take two people to do this experiment. You will need some sheets of paper. (Scrap paper is fine, you don’t need to waste good paper.) Cut the paper so that it is square. One person will hold one edge of the paper, ready to make a rip across in one direction. The other person will hold an adjacent edge (not the opposite edge) and be ready to rip. The rips you are trying to make will be perpendicular, not parallel. One person will make it across to the other side and one person will not. Ready, set, go! Make sure you start at the same time. You both want to rip simultaneously. However, one person will be just a fraction of a second ahead. You won’t find out who was ahead until you see who is holding a full half sheet of paper after the ripping is over. // Does this activity help you to understand how that “T” could have formed in the Indian Ocean?
********************************************
FOLLOW-UP ACTIVITIES for students using this course for credit:
READING: Read pages: 125-130. (Can stop when it says “Continental Drift Phase”)
VIDEO TOUR:
Here is a lab in Delft, Netherlands, testing the strength of materials. (3.5 minutes) https://www.youtube.com/watch?v=-6kPU0zoXVo
HOW TO USE GOOGLE EARTH to find initiation point of crack:
If you are a fan of Google Earth and you’d like to know how to use it yourself to find the possible initial point of the crack, here are the instructions:
PLEASE NOTE: We are in the realm of theory, not fact. Remember, this is one person’s idea. I am not entirely sure that this black line is correct. When I look at the seafloor to the east of the tip of Antarctica, where there is a large backwards C curve, I wonder about that T in the South Atlantic, right near Bouvet Island. I think it is entirely possible that the first crack went from below Africa to below South America. We will analyze this more in future lessons.
LAB: Strength of materials experiment
Use the following link to find directions and printables for an engineering lab that lets you calculate the compressive strength of clay. There is a short video showing you what to do, and some downloadable PDF charts and graphs (below the materials list).
https://www.teachengineering.org/activities/view/cub_brid_lesson04_activity1


